Provision highly available web stack using Amazon Elastic Beanstalk, Amazon MQ, Elastic Cache and Amazon RDS with just few clicks


In my last article we provisioned web stack using ec2 instances by manually setting up each and every service in default VPC. This was time consuming, was not highly available and was not an ideal approach when aws offers so many managed services. So, solution to that problem is to provision the web stack by utilising aws managed services in custom VPC. So, in this article we will be deploying a highly available java based web application in aws using Elastic Beanstalk, Amazon MQ, Elastic Cache and Amazon RDS. Below is the architecture we will be building. We will provision only Application Load Balancer(ALB) in public subnet and rest of the services in private subnets to make the setup more secure. So, lets dive in.
Prerequisites
- An AWS account
- JDK8 installed on your local machine
- Maven installed on your local machine
- Custom VPC with public & private subnets in each AZ of your nearest region in aws (Route tables, Nat gateway and Internet gateway should be configured in your custom VPC)
Please Note: I have 3x private(10.0.1.0/24, 10.0.2.0/24, 10.0.3.0/24), 3x public subnets (10.0.4.0/24, 10.0.5.0/24, 10.0.6.0/24) in eu-west-2 region in custom VPC(10.0.0.0/16) and will be using through out this setup.
Steps Involved:
- Create Key pairs and security group for backend services.
- Provision Multi-AZ MySQL using RDS service in private subnet group of our custom VPC.
- Provision 2xnode Memcached cluster using Elastic Cache in private subnet group of our custom VPC.
- Provision Active/Standby ActiveMQ message broker using Amazon MQ service in 2xprivate subnets our custom VPC.
- Upload build application artifcat in Elastic Beanstalk, which in turns deploys our complete web application by provisioning tomcat ec2 instances in Auto Scaling Group(ASG), ALB, etc. and then update backend security group to allow frontend to interact with it.
- Then Copy our Elastic Beanstalk environment end point and add it as CNAME in the domain provider dns setting to divert the traffic to ALB, So, that users can use meaningful URL to reach our application. And update the same URL in Cloud Front to be distributed using CDN.
1. Create key pairs and security group for backend services:

First we will create key pair required to launch an ec2 to initialise RDS with our database schema and also for the ec2 instances which Beanstalk provisions . So, go to ec2 Mgmt. console, click key pairs from left side column, click create key pair, give a name, select pem format and click create key pair. This will download the public key on your machine and private key is safely stored.
Once key pair is created we will create security group for our backend services, so click security groups from left side column of ec2 Mgmt. console, click create security group, give a name, description and add a rule, which allows traffic from same security group. We add this rule because we want all our backend services to interact with each other.

Note: We will come back and edit this security group once Beanstalk provisions tomcat ec2 instances and its security groups, to allow tomcat ec2 instances to communicate with backend services.
2. Provision Multi-AZ MySQL using RDS service in private subnet group of our custom VPC:
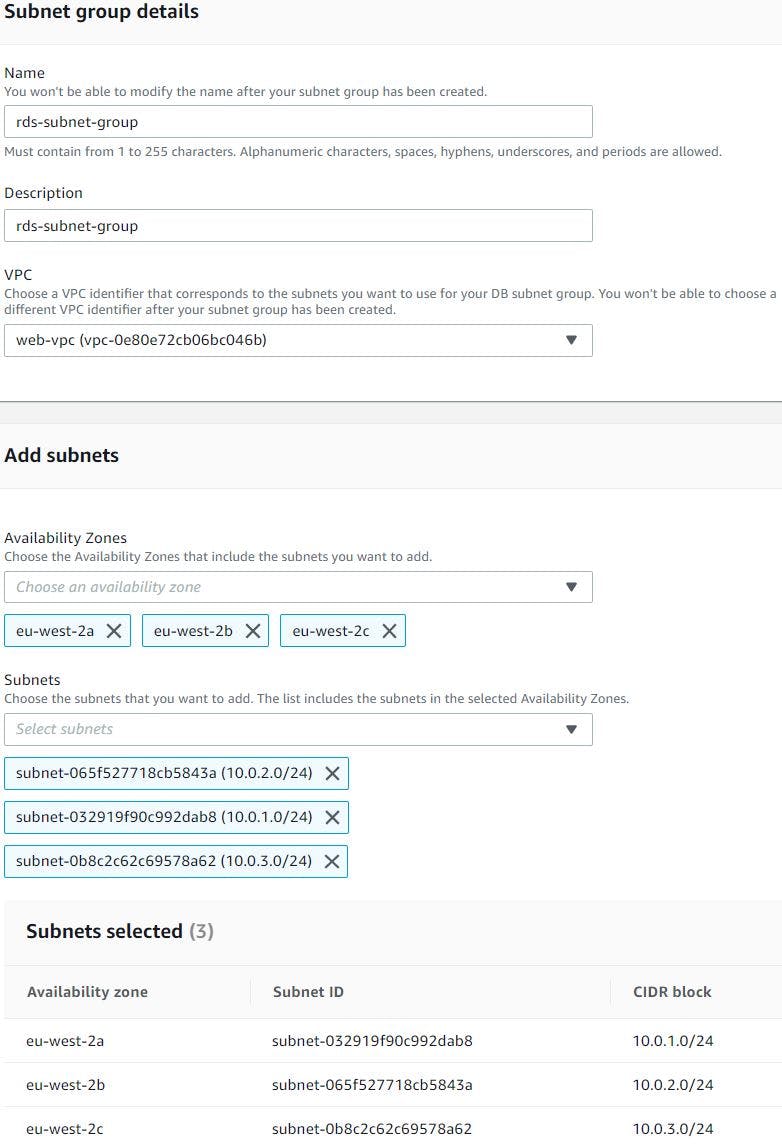
Go to RDS console through service search bar, once you are on the page click subnet groups, click create subnet group. An RDS Subnet Group is a collection of subnets that you can use to designate for your RDS database instance in a VPC. The database within your VPC will use the Subnet Group and the preferred Availability Zone to select a subnet and an IP address within that subnet. So, we will select all the availability zones and corresponding private subnets and then click create.
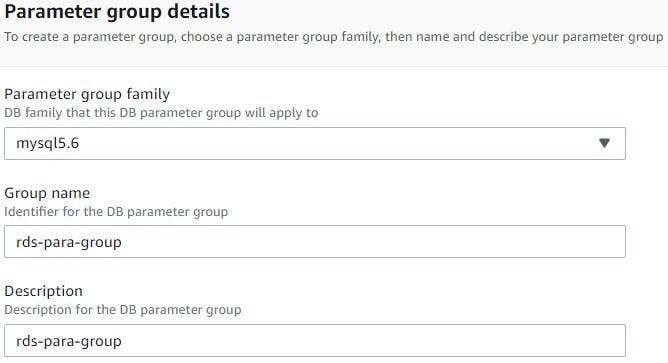
Then click parameter groups from left side column of RDS console, then click create parameter group, we will select MySQL 5.6 engine as this best suits our application, give name and description, then click create. We are not really making any changes to the RDS using this parameter group but in the future if we need to tune RDS according to our needs then we can easily change them using some of the parameters listed in this groups. Also this saves us from rebooting the db instances if we ever need to switch from default parameters group to custom parameter group. So, having custom parameter groups when provisioning RDS is quite helpful.
Once the parameter group is created we will create RDS database now by clicking databases from left side column of Amazon RDS console then clicking create database, select standard create, choose MySQL engine, version 5.6.34.
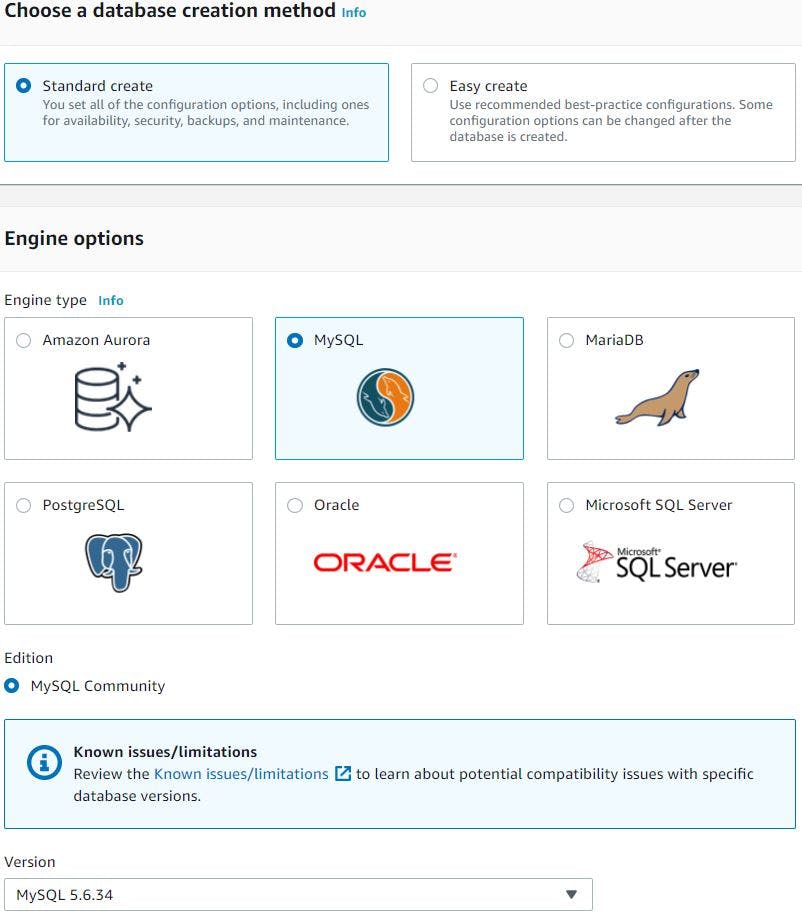
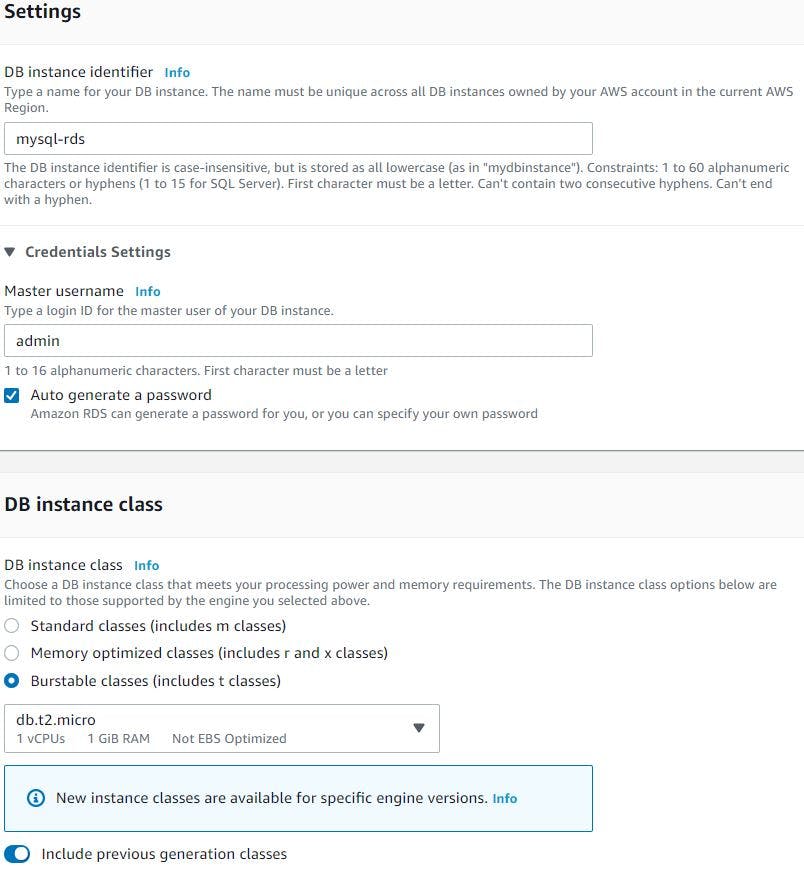
We will chose Dev/Test template (we can also choose free tier if we want but free tier doesn't come with standby RDS instance in a different Availability Zone (AZ) which provides data redundancy and eliminates I/O freezes, also minimize latency spikes during system backups). Give a name for DB instance, give master user name and password (I will choose password to be autogenerated), we will choose db instance class as burstable t2.micro to keep the cost low again (but in production we definitely need to aim for r or m series type instances)
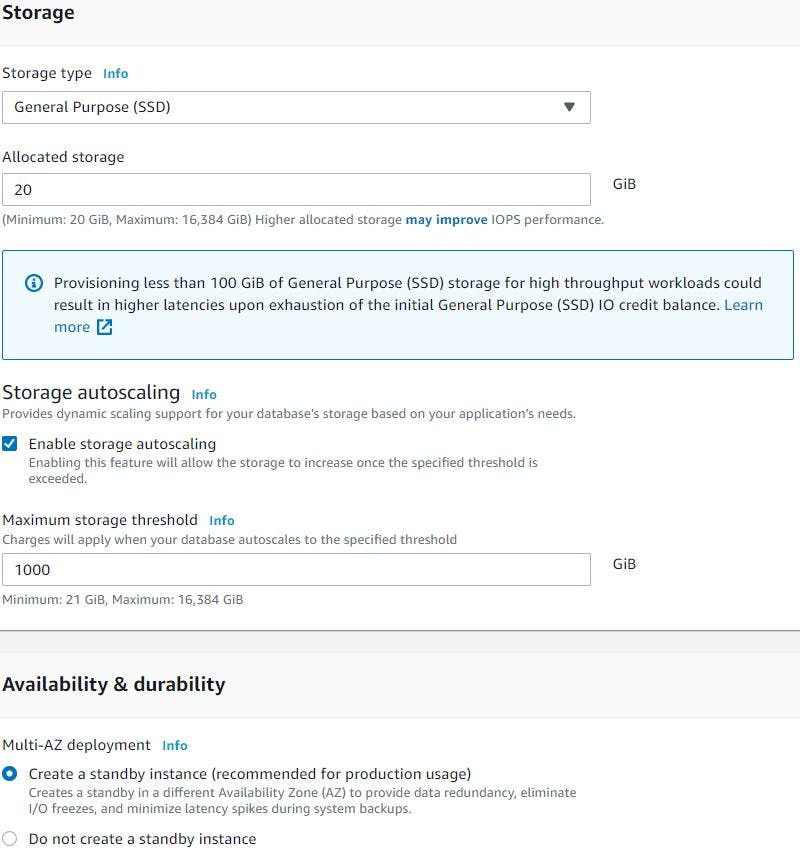
We will select storage as General Purpose SSD & minimum storage capacity we can go for is 20 GiB, we will also enable storage autoscaling in case if our database requires more storage then it can scale up to 1000 GiB. We will also enable Multi-AZ deployment as this will create standby instance in different AZ to provide data redundancy.
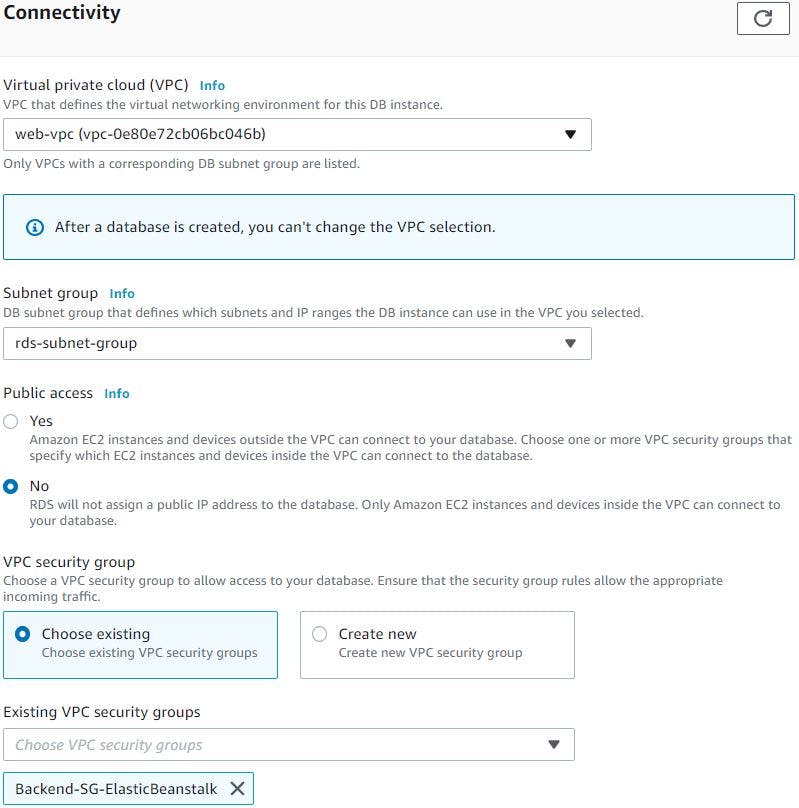
In connectivity section we will select our custom VPC, subnet group and security group we created created earlier and the default port 3306.
For database authentication we will chose it as password authentication, in additional configuration section we want database name accounts to be created for our web application. So, we will specify the name 'accounts' as initial database name. We will chose the parameter group we created earlier, enable automatic backups, backup retention period as 7 days but can be selected from 7 to 35 days. Enable enhanced monitoring to see how different process or threads use the CPU, again we can have enhanced monitoring granularity from 60 secs to all the way down till 1 sec.
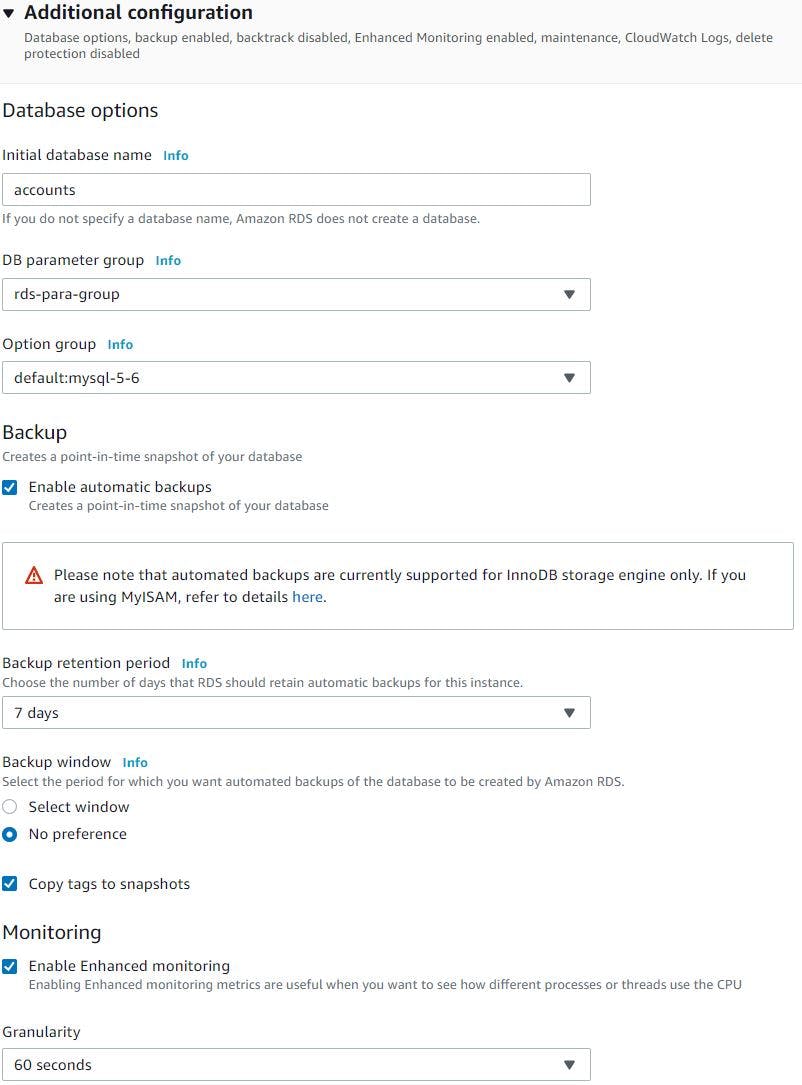
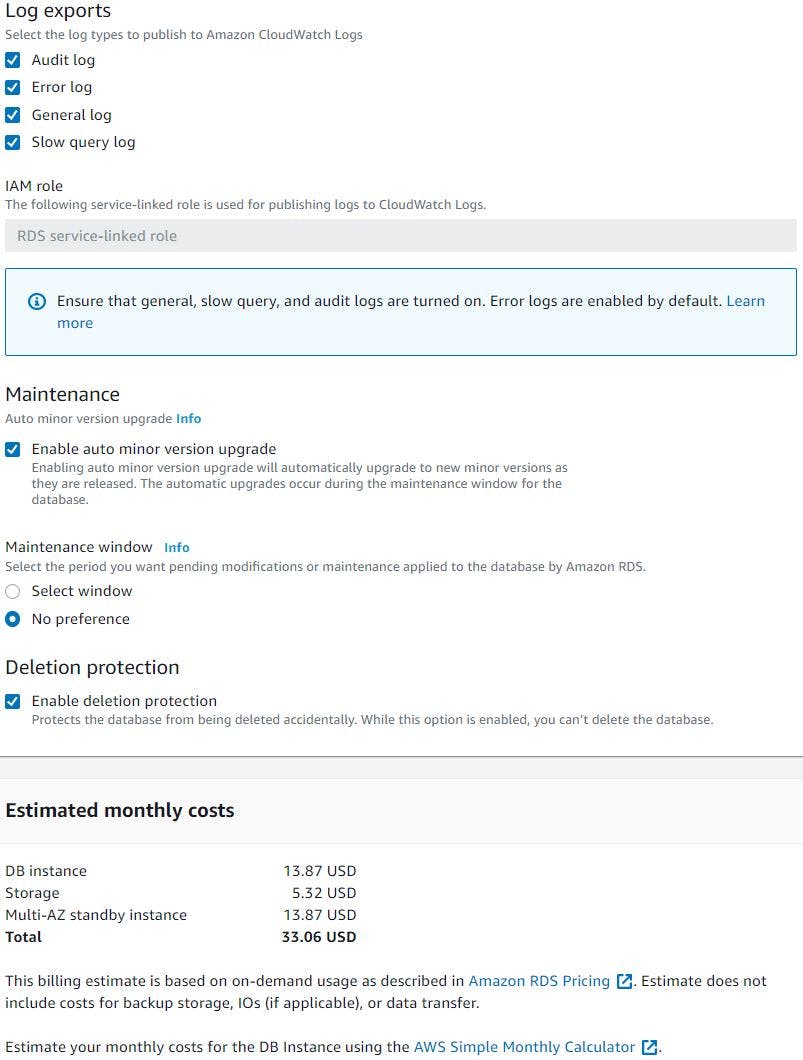
We will let the RDS to create the IAM role required to monitor the instance, we will export all (Audit, Error, General and slow query logs) logs to CloudWatch logs. Note Error logs are enabled by default. We let aws manage the minor version upgrades. Also enable deletion protection so that our database is protected from accidental deletion. Once we click create it will auto generate the password, we will keep it safely as we will be initialising this RDS with the schema required for our application later. This will take some time to spin up the db instances. Once RDS is up and running we will make a note of its endpoint and update in our application source code.
We will launch an EC2 instance in any one of the public subnet of custom VPC, SSH into that instance, install MySQL client, then connect to RDS using endpoint, username and auto generated password we saved earlier to initialise the 'accounts' database required for our application.
3. Provision 2xnode Memcached cluster using Elastic Cache in private subnet group of our custom VPC:
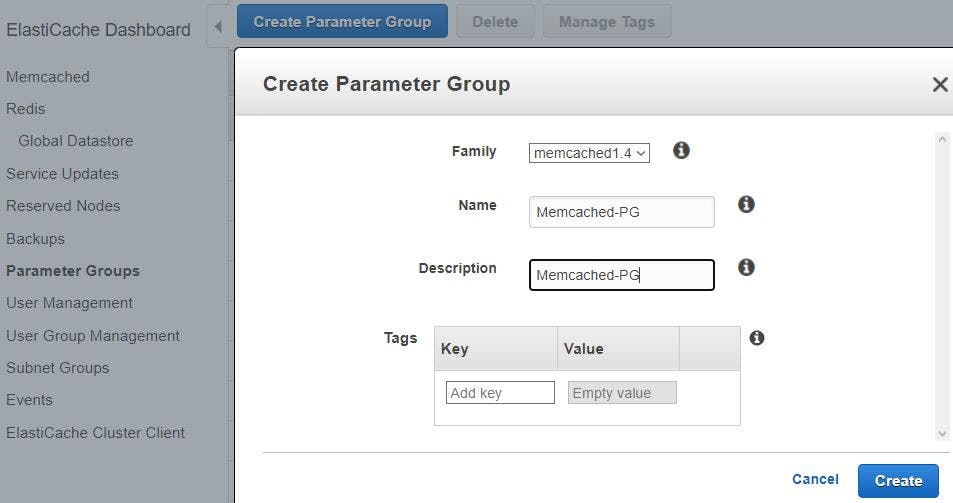
We will go to ElasticCache service page via service search bar, then click parameters group from left side column, click create, select family as Memcached 1.4, give name, description and create. We will be going with default parameters group anyway but in case if our application needs any tuning in the future we can make changes.
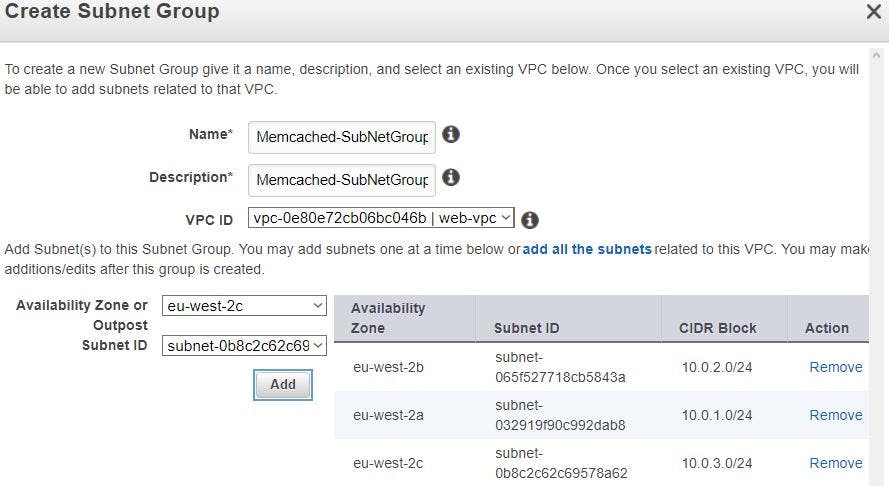
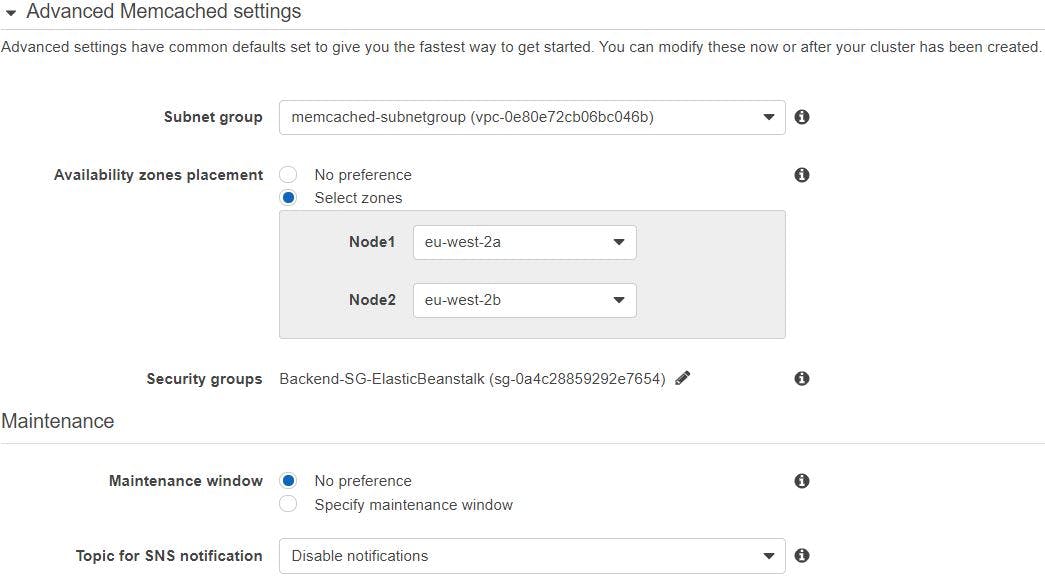
Once parameter group is created, we will create a subnet group (Memcached will be launched in one of the subnets mentioned in the group), so click subnet group from left side column and then click create subnet group. Then give a name, description, choose custom VPC, add AZ and respective private subnets id, we will add all 3x AZ’s & corresponding private subnet ids.
Click Memcached from left side column, click create, select Memcached, choose a location as amazon cloud, give a name, engine version as 1.4.24, port 11211, select parameter group we created earlier, node type t2.micro should be fine for this setup, number of nodes as 2.
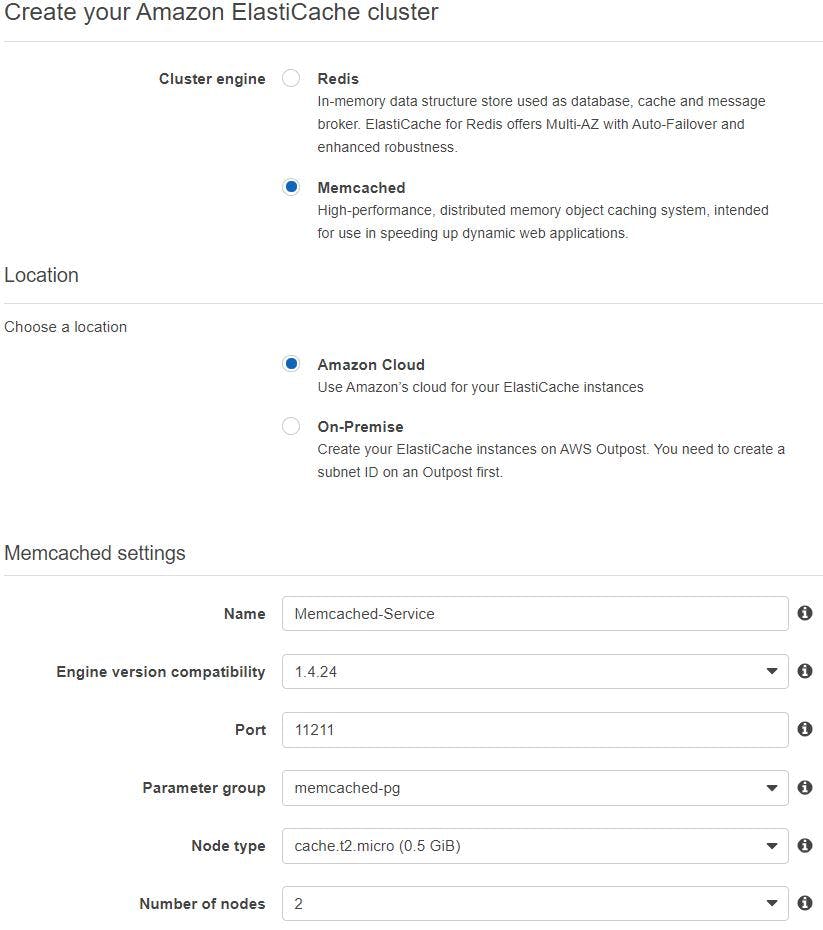
Select subnet group we created earlier, security groups as well we created for the backend services and select in which availability zones you want this 2xnodes to be placed and then click create.
Once it is up and running we will copy its endpoint and update this in our application source code.
4. Provision Active/Standby ActiveMQ message broker using Amazon MQ service in 2x private subnets our custom VPC:
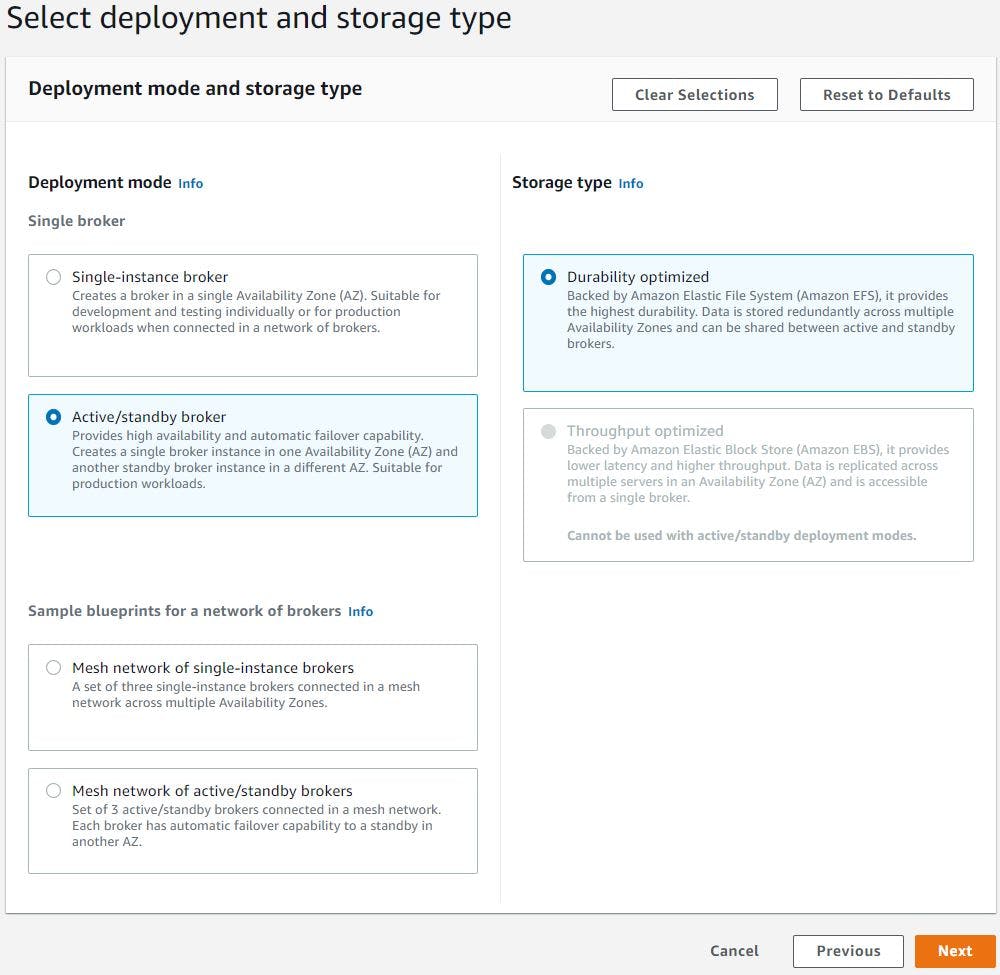
Go to Amazon MQ service page via search bar, click get started, select Active MQ and click next. We will select Deployment mode as Active/standby broker which provides high availability and automatic failover capability. This creates a single broker instance in one Availability Zone (AZ) and another standby broker instance in a different AZ, select storage type as Durability optimized which is backed by EFS (Remember we cant use throughput optimized storage type for active/standby mode) and click next.
We will give a broker name, choose instance type as t2.micro (to save some cost), we will use simple authentication so give a user name and password.
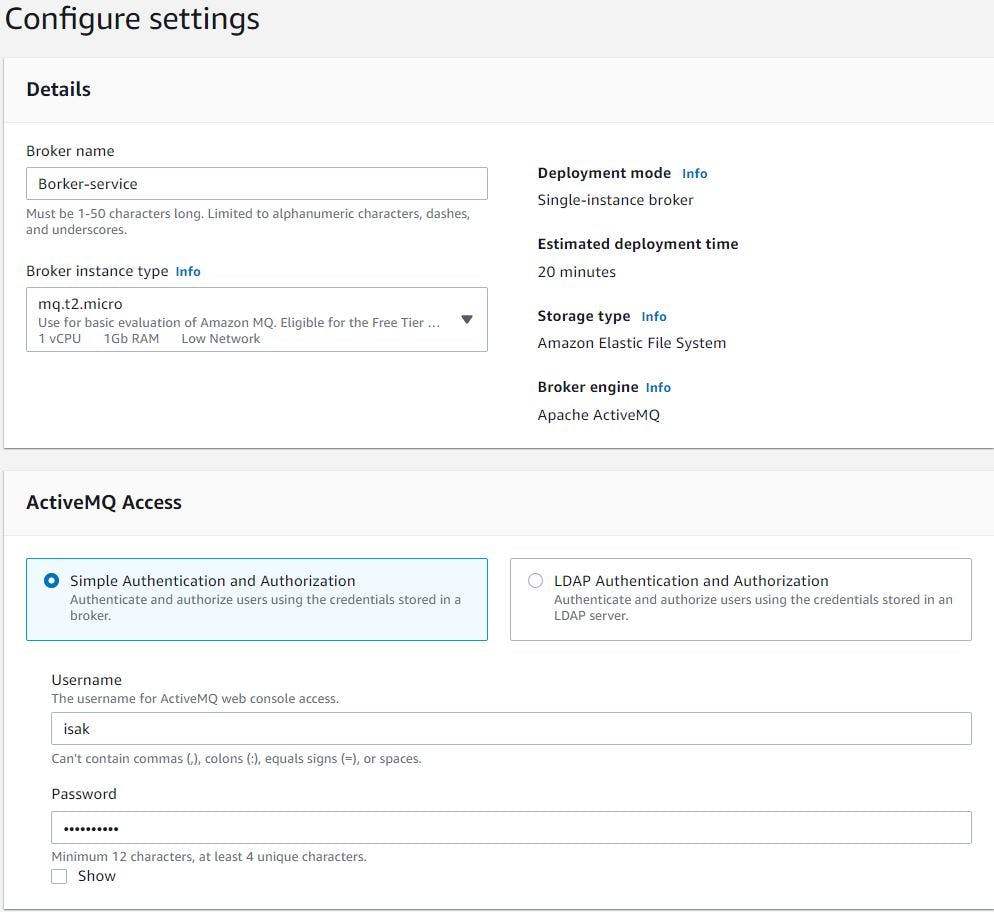
We will leave broker engine as default and let it to create configuration with default values. We will select general and audit logs to stream to CloudWatch, Select custom VPC and 2x private subnets for active/standby broker deployment. Next select the security group we created earlier for backend services.
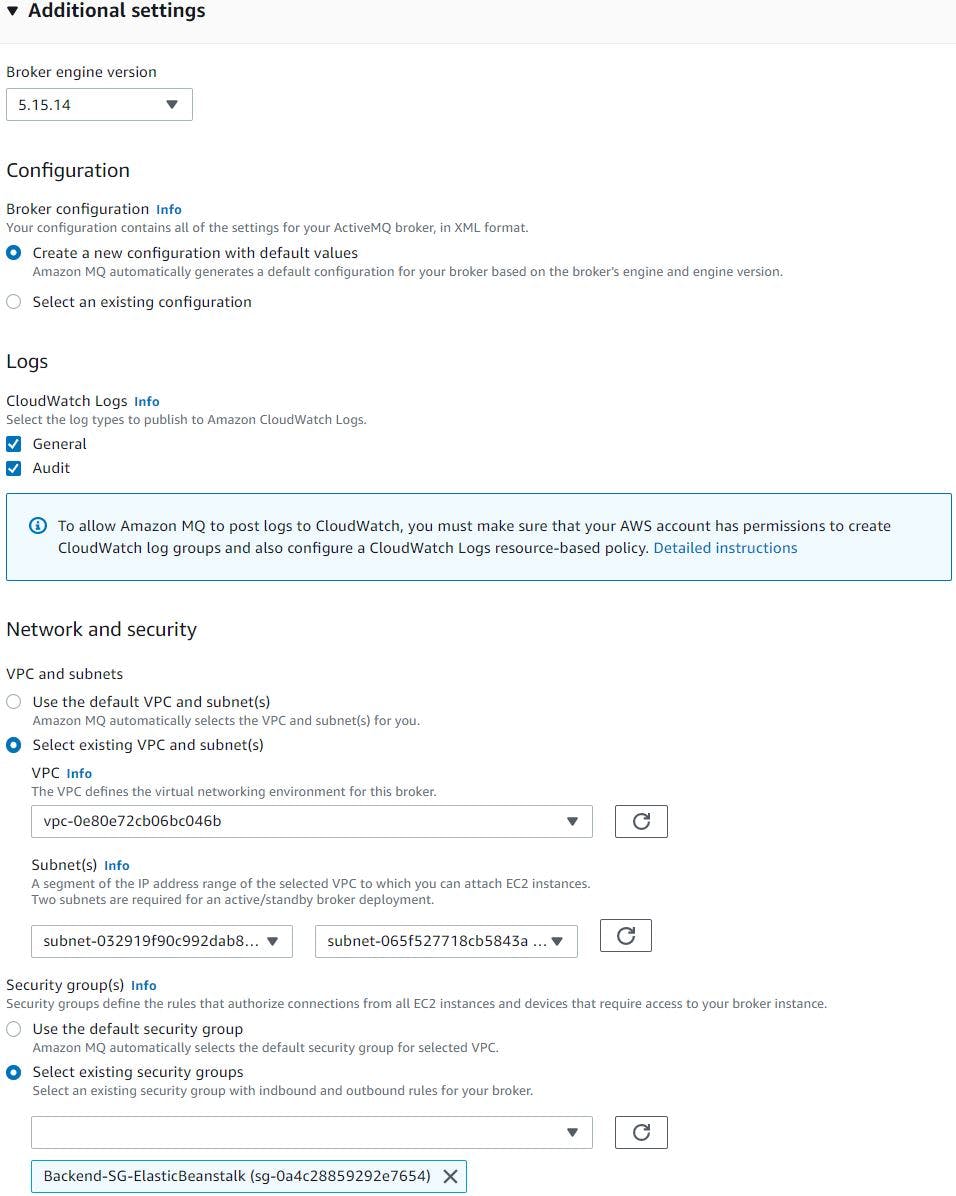
Encryption key leave it as default (aws owned CMK) and block the public accessibility. We will leave other settings as default. Then click create broker.

Aws estimates it will take nearly 15xminutes for the Active MQ deployment and I waited nearly 12xminutes. Once its up and running we will copy its endpoint and update this in our application source code.
5. Provision ALB in public subnet and Tomcat EC2 instances in private subnet in ASG using Elastic Beanstalk:
Elastic Beanstalk is the simplest way to deploy and run your web application on AWS. It automatically handles the deployment details of capacity provisioning, load balancing, automatic scaling, and web application health monitoring.
So, lets go and create it, go to Elastic Beanstalk service page via search bar and click create application, give application name, tags, select platform tomcat, then platform branch as Tomcat 8.5 with Corretto 11 running on 64-bit Amazon Linux 2 (which will be selected automatically), recommended version as 4.1.1 and finally upload our locally build artifact as application.
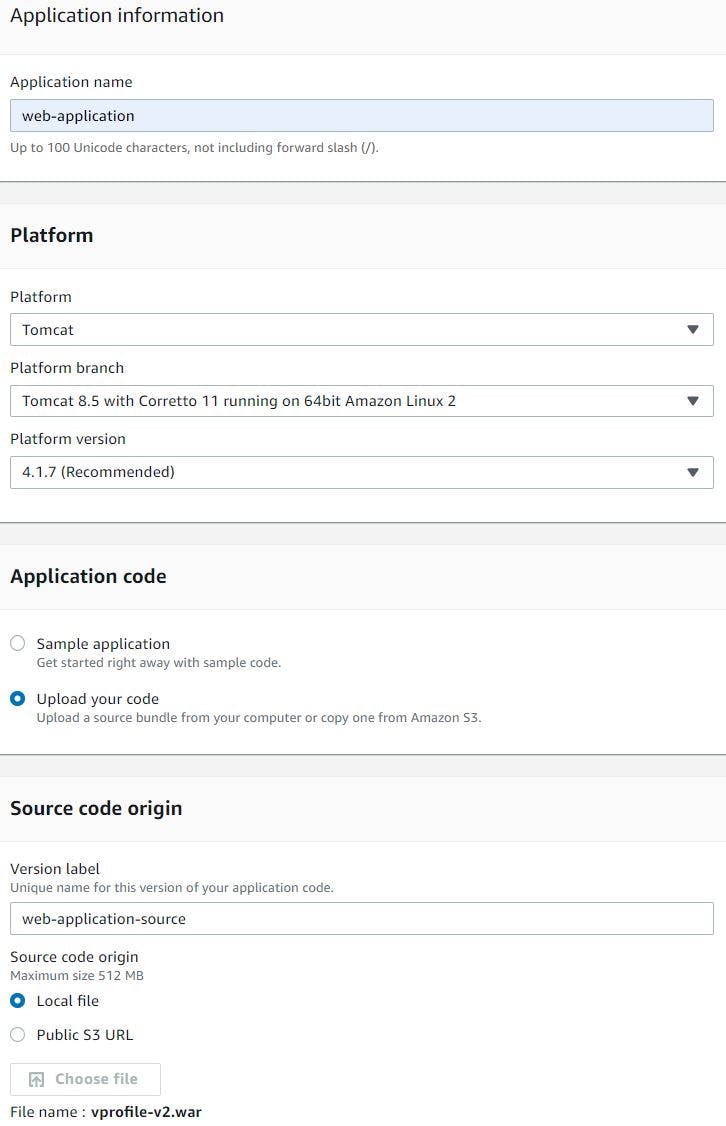
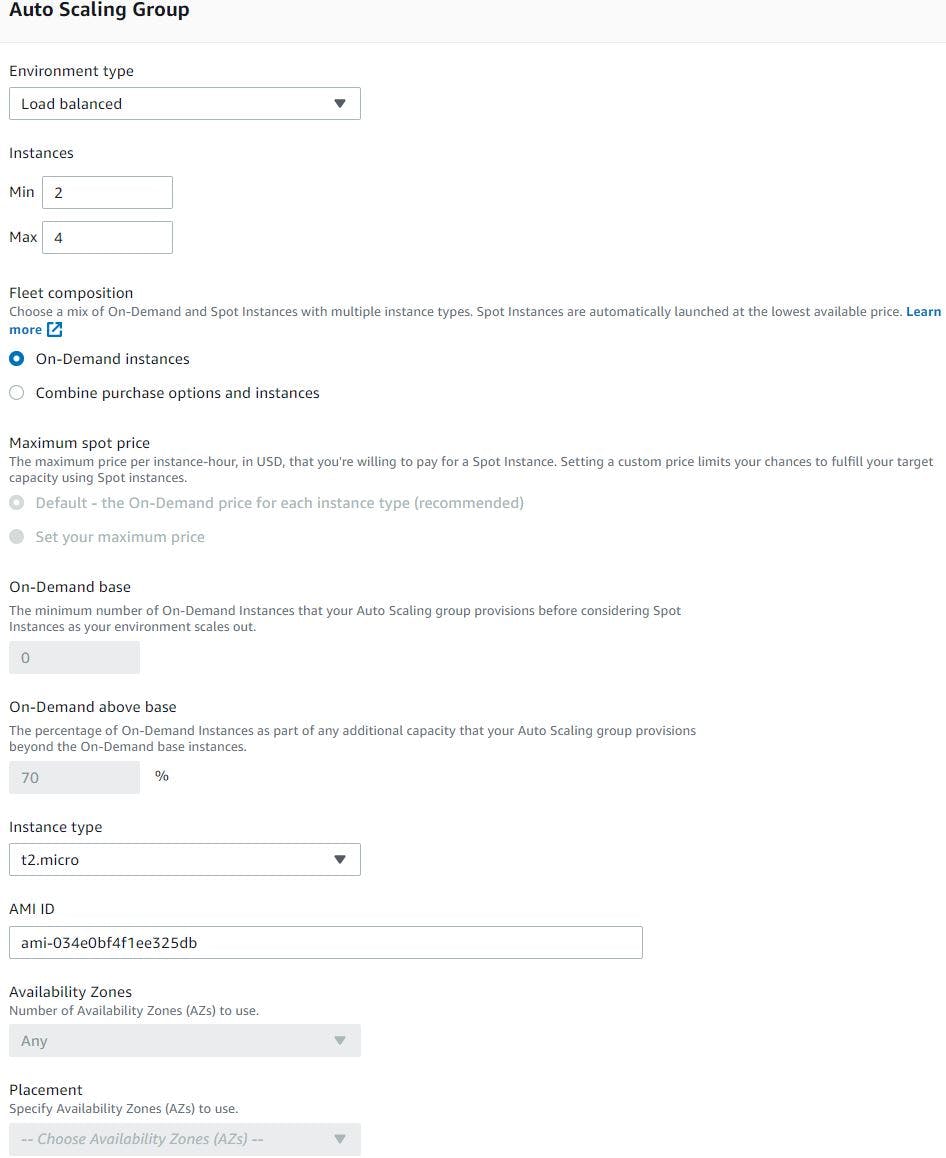
Once artifact is uploaded, click configure more options. We will first edit the capacity section as this is where we will let beanstalk know that we need an environment with Load balancer and Auto Scaling group. Specify the ASG settings like how many min and max tomcat EC2 instances you need and scaling triggers. We will choose min instances as 2, max as 4 , on-demand instance of t2.micro type. Next choose scaling matrix based on Network out matrix.

Next, select custom configuration, click edit network, choose custom VPC, for load balancer select public subnets and choose its visibility as public.
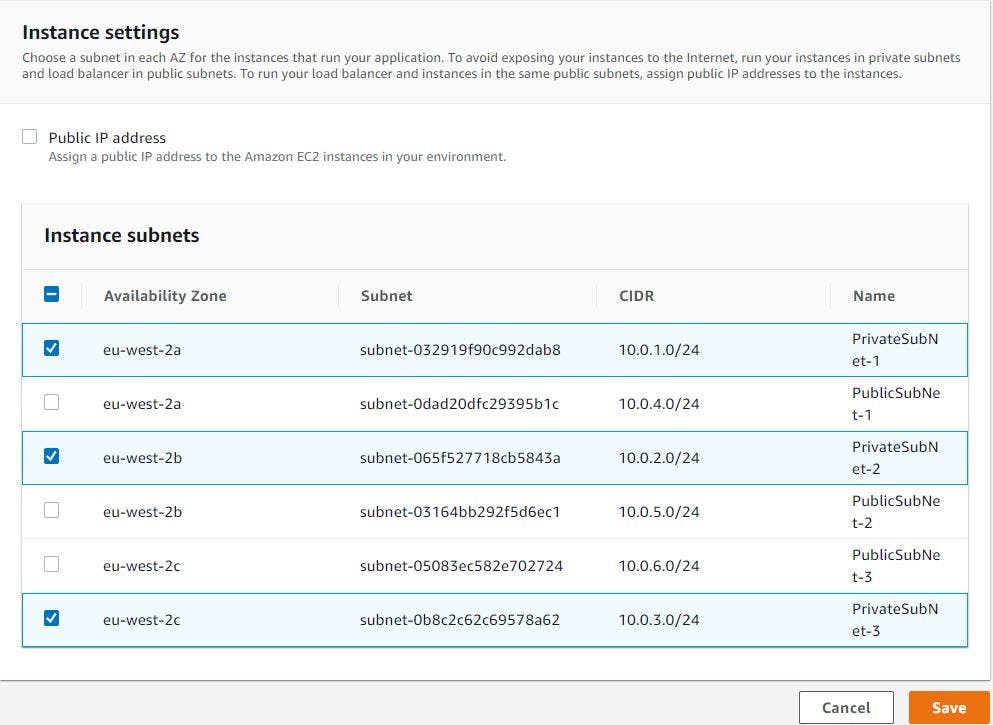
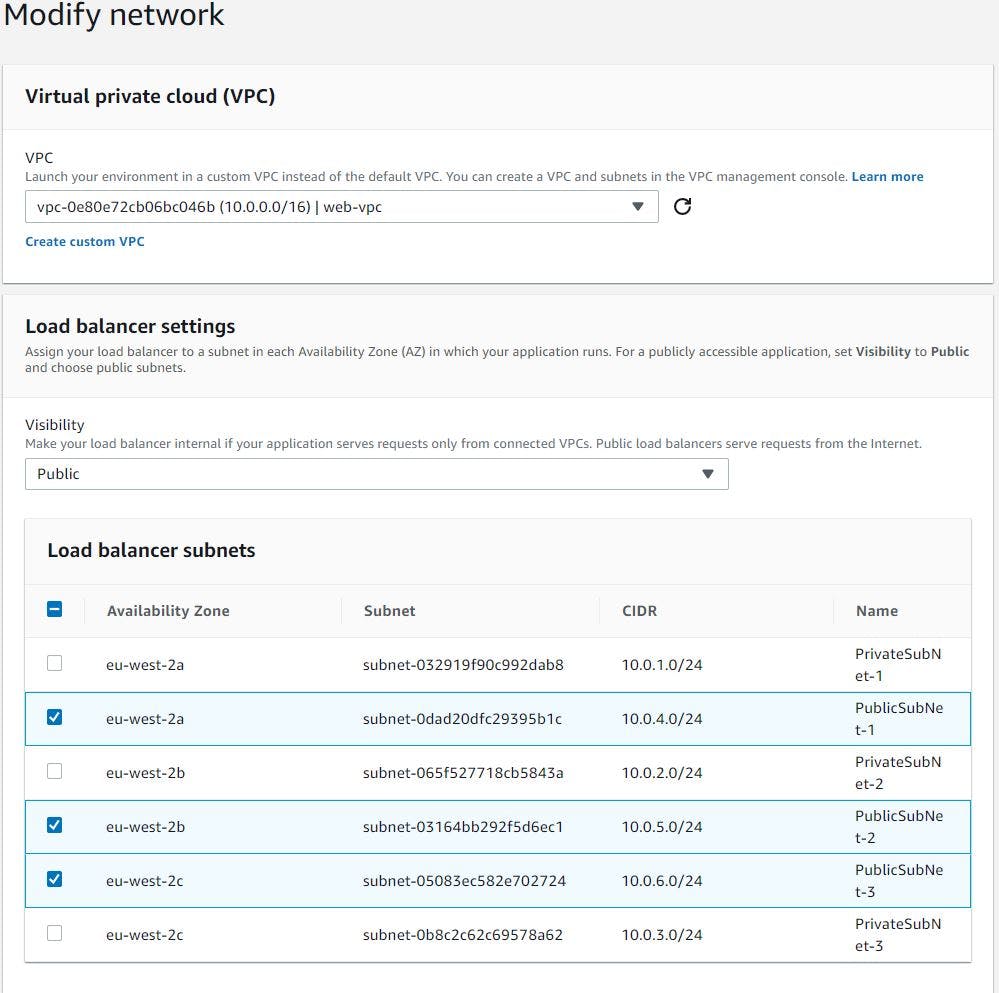 And for Tomcat ec2 instances, choose its visibility as private, and select private subnets in all AZ's.
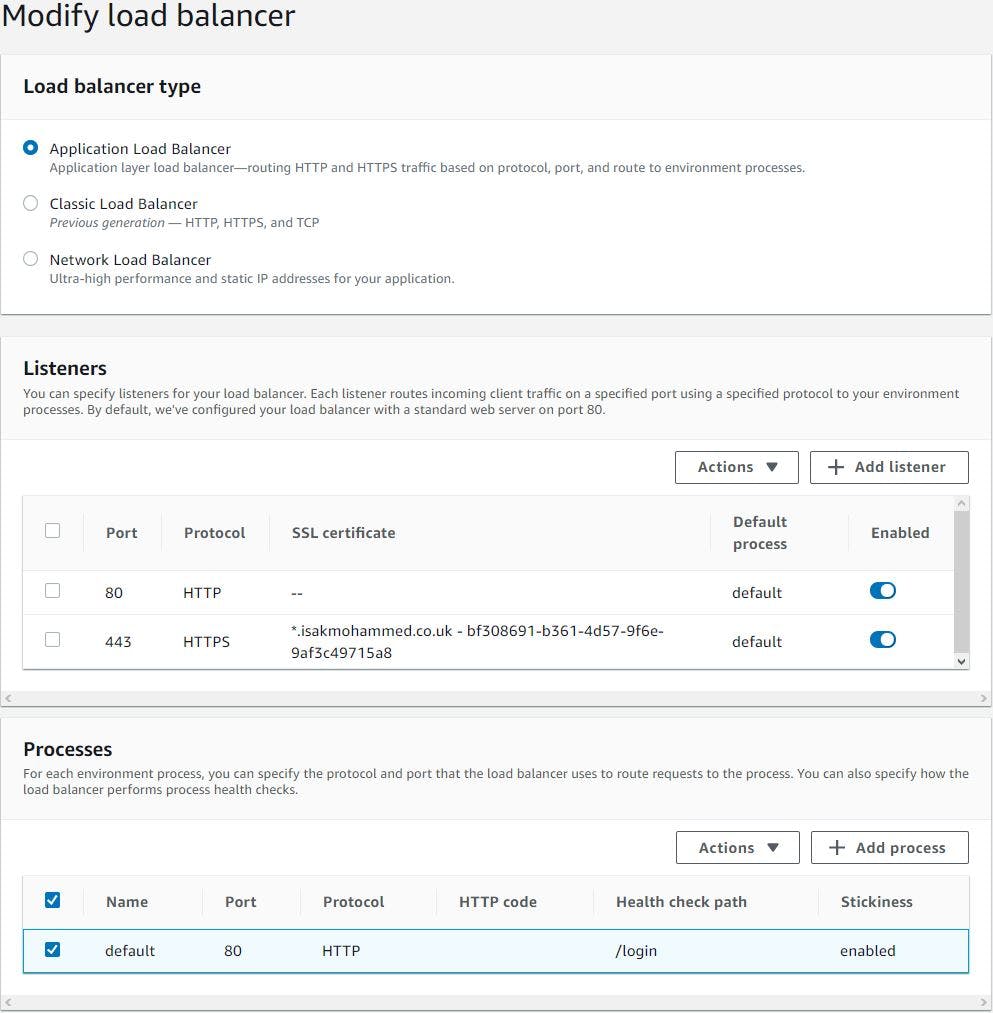
Next edit the load balancer settings, we will choose ALB, edit listeners section to allow https traffic on port 443 using TLS certificate from ACM (Amazon certificate Manager) Finally edit processes section to set the correct health check path, our application listens on /login so we will change the path from / to /login and enable stickiness on load balancer.
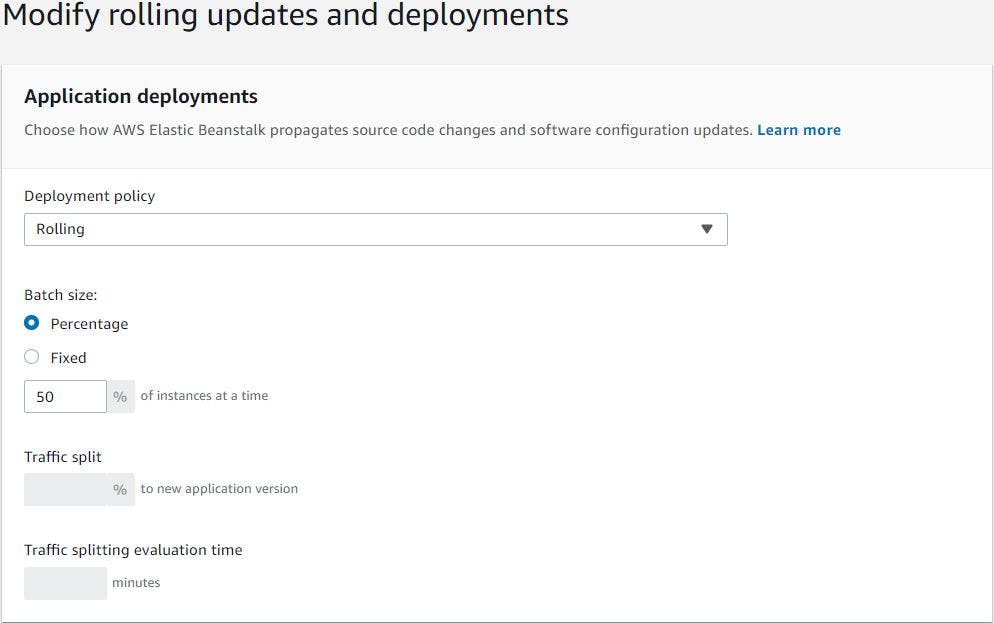
Next we will modify rolling updates and deployments section, we will choose deployment policy as rolling and batch size of 50%. Because minimum instances we will have in our environment is 2. So Beanstalk will take one instance out at a time to deploy the updates and rest of the settings we will leave as default.
That's it, click create application. This will go and deploy the our application by creating instances in ASG in private subnets and ALB in public subnet. Once our application is deployed it will be unresponsive due to our application not able to connect to backend services. So, we need to update the security groups of backend services to allow tomcat instance provisioned by Elastic Beanstalk to connect with backend services. (Please note Elastic beanstalk creates 2x security groups one for ALB and other for Tomcat ec2 instances, so that's the reason we didn't create security groups in advance.)

After updating the backend security groups, we can access our application using ALB endpoint or our Elastic Beanstalk environment endpoint .
6. Copy our Elastic Beanstalk environment end point and add it as CNAME in the domain provider dns setting to divert the traffic to ALB, So, that users can use meaningful URL to reach our application. And update the same URL in Cloud Front to be distributed using CDN
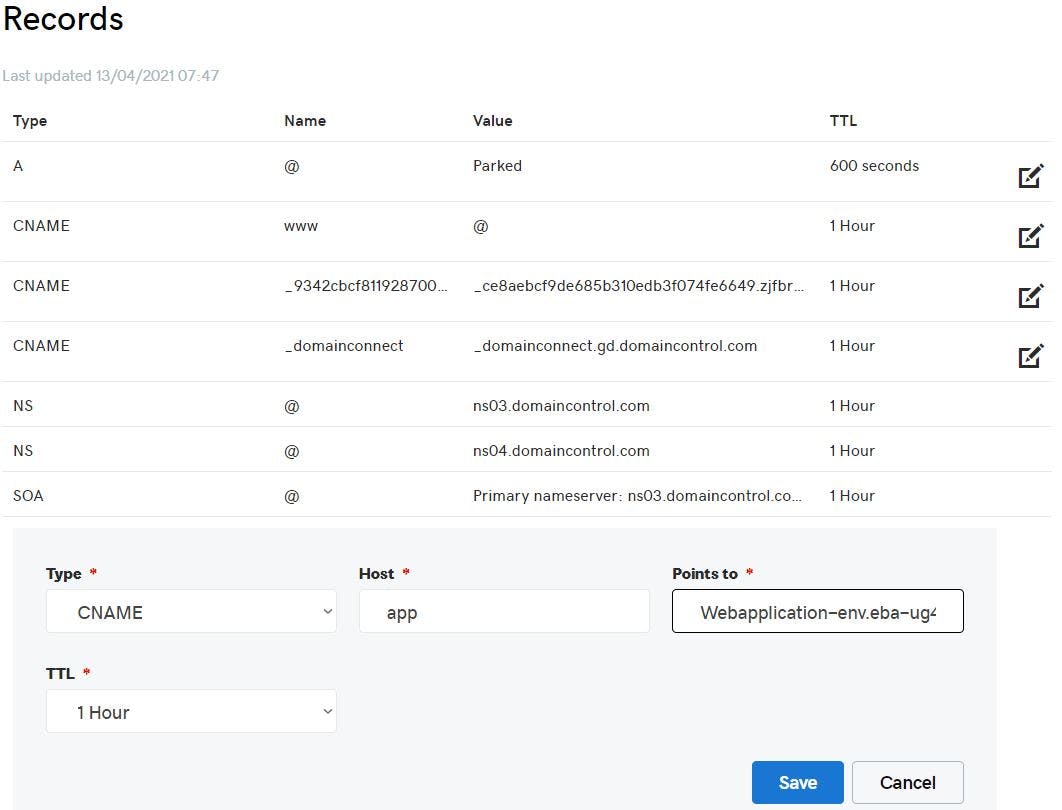
But we don't want users to use the Elastic Beanstalk environment endpoint to access our application rather we want them to use something easy so that they can remember URL name. So, we will copy Elastic Beanstalk environment end point and add it as CNAME in the domain provider dns setting to divert the traffic to Elastic Beanstalk environment endpoint once the users hit URL app.isakmohammed.co.uk.
All looks good, but still we want to improve end users experience when interacting with our application form any corner of the world. In order to do this we will be using Amazon CloudFront services. Amazon CloudFront is massively scaled and globally distributed service. The CloudFront network has 225+ points of presence (PoPs) that are interconnected via the AWS backbone delivering ultra-low latency performance and high availability to your end users. The AWS backbone is a private network built on a global, fully redundant, parallel 100 GbE metro fibre network linked via trans-oceanic cables across the Atlantic, Pacific, and Indian Oceans, as well as, the Mediterranean, Red Sea, and South China Seas. Amazon CloudFront automatically maps network conditions and intelligently routes your user’s traffic to the most performant AWS edge location to serve up cached or dynamic content. CloudFront comes default with a multi-tiered caching architecture that offers you improved cache width and origin protection.
Go to Amazon CloudFront services mgmt. console through service search bar, click create distribution, click get started, give your application URL as origin domain name, CloudFront will automatically select origin ID & SSL protocol as TLSv1, select protocol policy as Match Viewer.
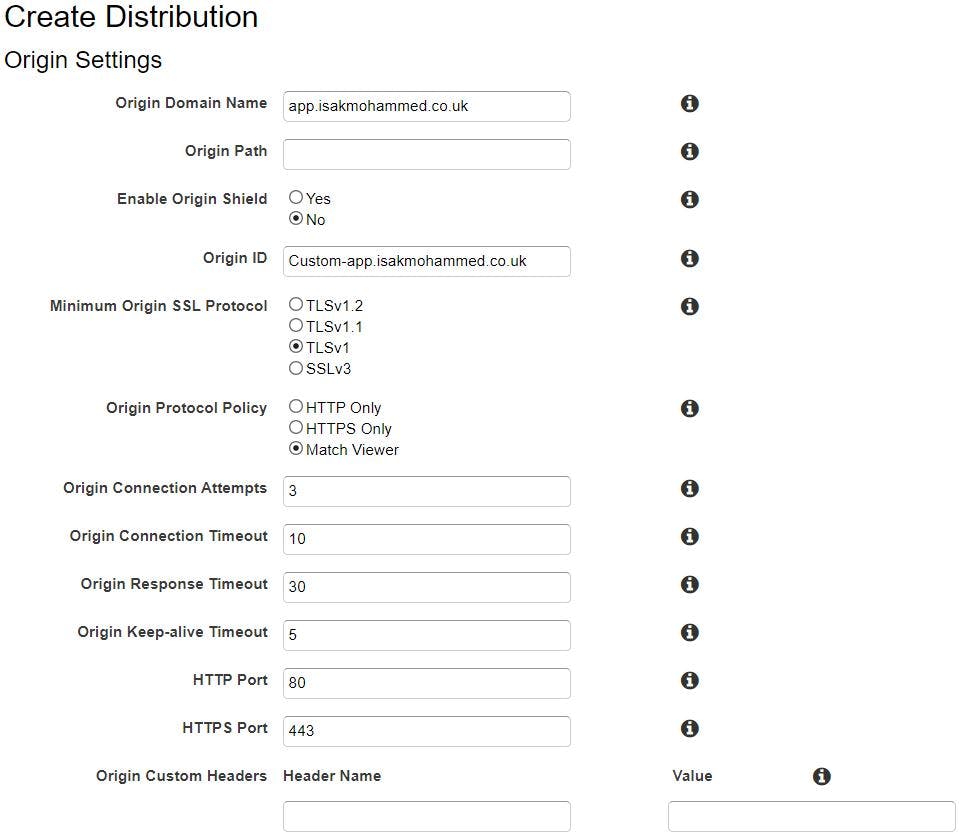
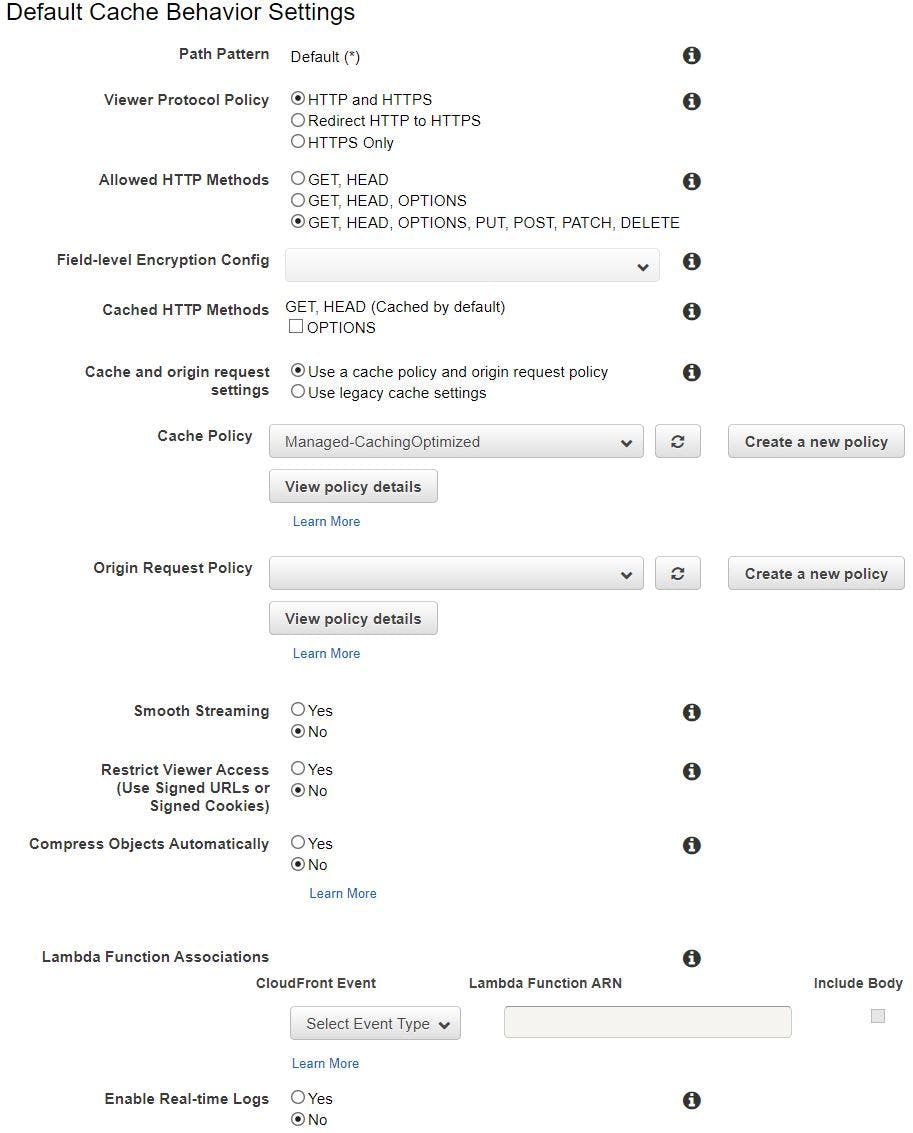
Select Viewer Protocol Policy, Allowed HTTP methods and leave others as default
Select prices class, SSL certificate from ACM(Amazon Certificate Manager) and security policy and then click create distribution.

This will take some time, once distribution is deployed and enabled. We can check from our browser by using domain name displayed in CloudFront console and it should lead to our application.

Pros:
- By using Elastic Beanstalk we were able to provision ec2 instances, load balancer, ASG with few clicks. So, it completely saved us from provisioning individual ec2 instances, installing dependencies of tomcat, removing default application and then loading the artifact, etc.
- Elastic Beanstalk also allowed us to configure to set the custom VPC for our application of our choice, it created ec2 and load balancer in subnets we required them to be in.
- As all the services in this setup are aws managed we don't need to worry about minor version upgrade or patching/updates on this services.
- There is rolling deployment policy in place in elastic beanstalk which allows to upload different application versions with minimum down time.
- We have enabled monitoring on each managed services and this allows us to monitor the services and react in good time.